Equipment
What each piece of the setup does, and how to choose and assemble it.
Your home oxygen setup is made of four interconnected pieces (illustrated just below):
- Cylinder: the steel or aluminum tank that holds the oxygen under pressure.
- Regulator: a component fitted to the cylinder valve that controls how much oxygen is released.
- Some cylinders have the regulator built into the cylinder head and do not need a separate one. See Integrated-valve cylinders.
- Breathing equipment: the device that delivers oxygen into your lungs. It can be a demand valve connected with a mouthpiece or a mask, or a non-rebreather mask equipped with a reservoir bag.
- Tubing: connects the regulator to the breathing equipment.
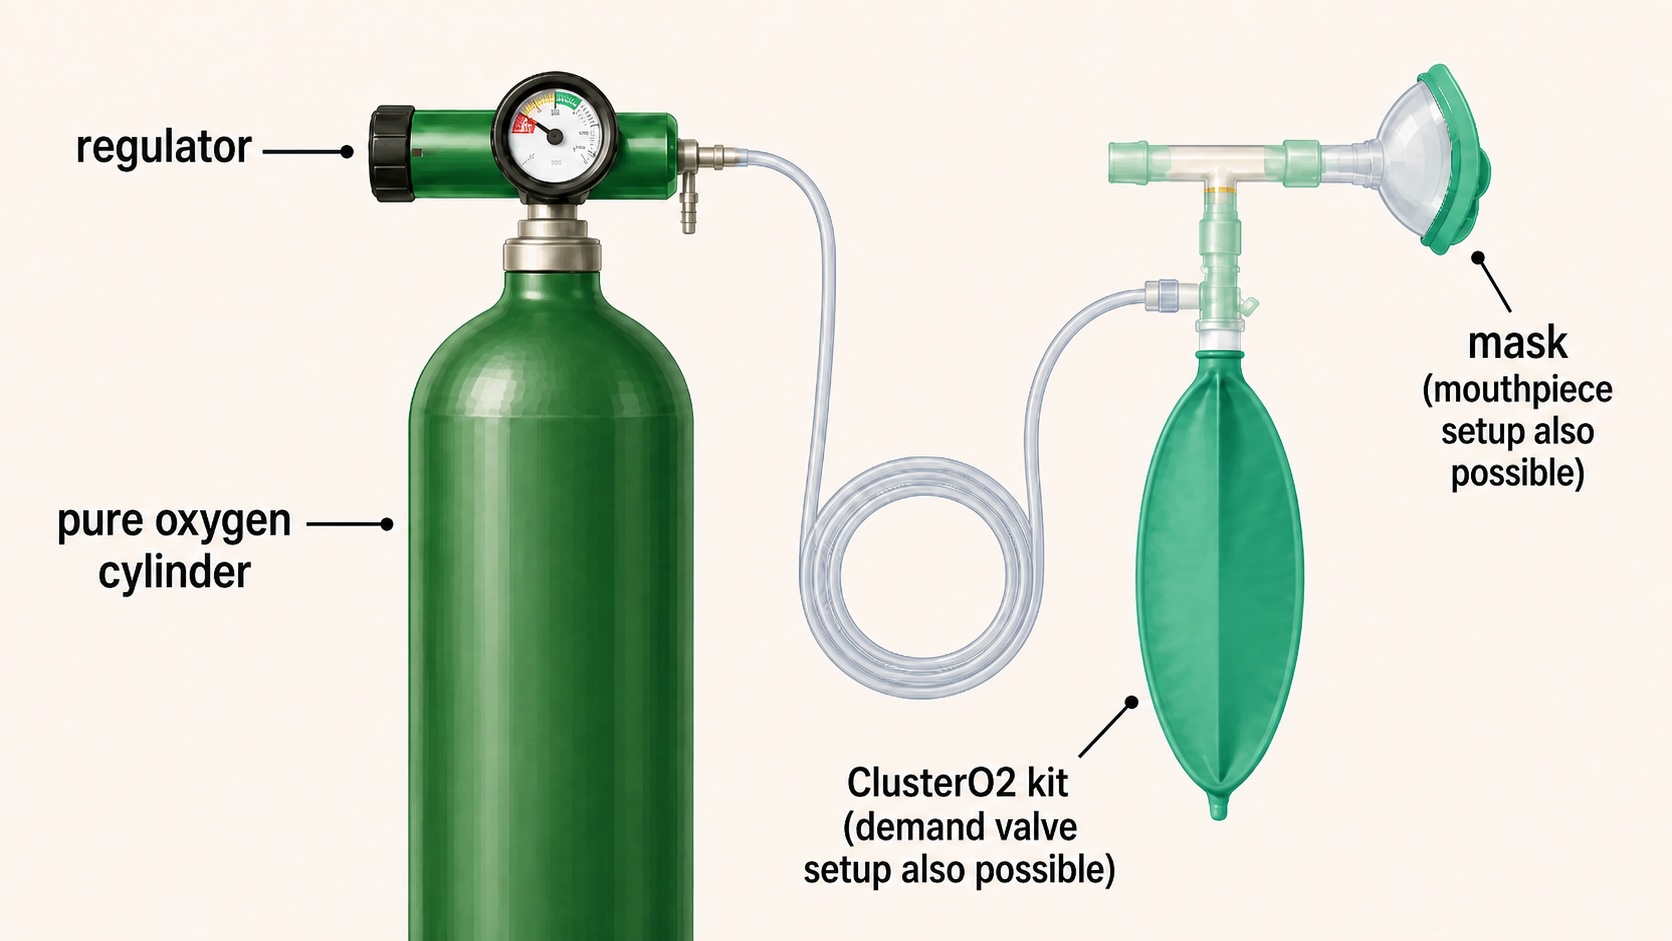 A complete home oxygen setup. The flow regulator controls how much oxygen (in liters per minute (LPM)) is released from the cylinder. Tubing carries it to the breathing equipment, here a ClusterO2 kit (a non-rebreather mask specifically designed for cluster headache oxygen therapy).
Breathing equipment
Two families of breathing equipment work well for cluster aborts: demand valves and reservoir-bag setups (using either a ClusterO2 kit or a more basic non-rebreather mask).
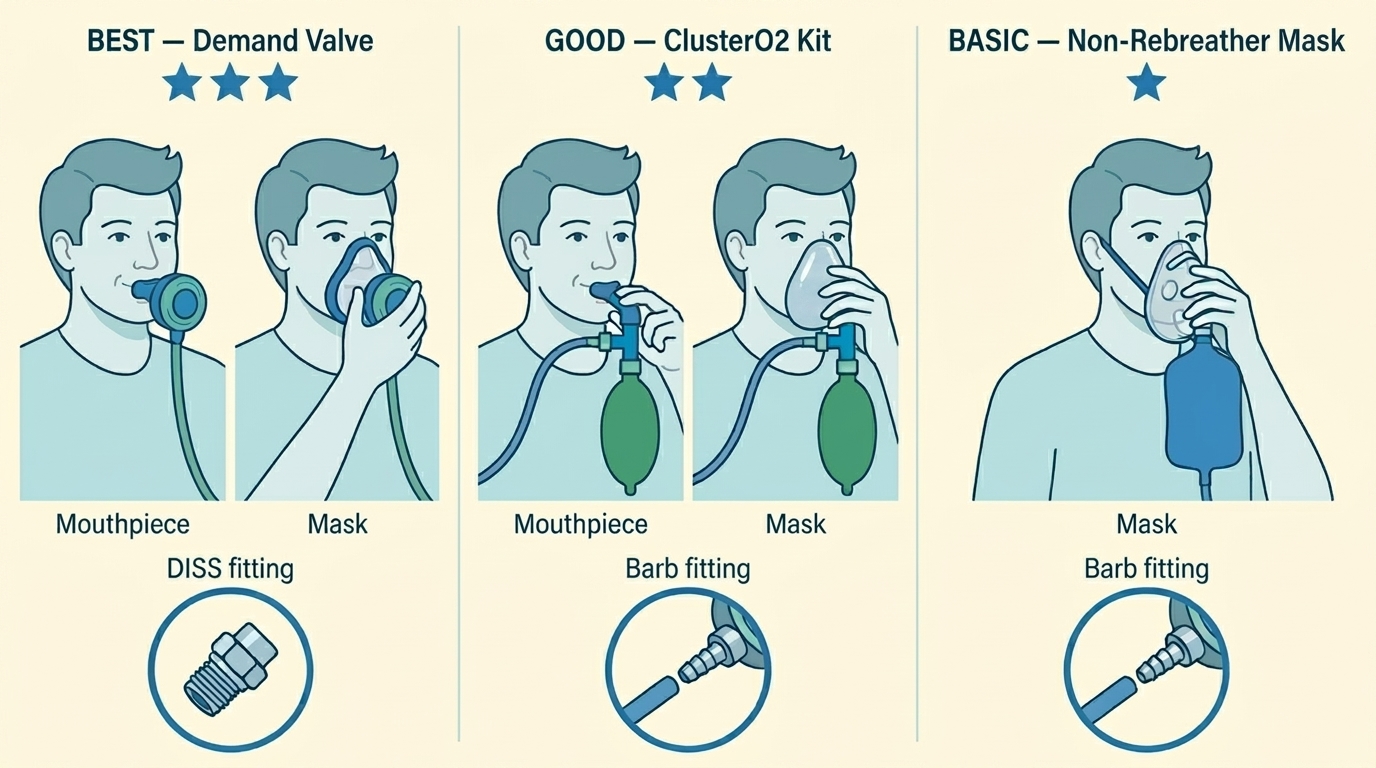 The delivery setups compared. From left to right: a demand valve (with mouthpiece or mask), a ClusterO2 kit (with mouthpiece or mask), and a standard non-rebreather mask.
Demand valve
A demand valve releases pure oxygen on each inhale and shuts off when you exhale. That lets you breathe as fast and deep as you want without running out, which makes hyperventilating on pure oxygen straightforward. For many people, hyperventilation is the fastest way to abort with oxygen.
A demand valve is expensive: in the US, roughly $250–400. Costs are covered by your health insurance in some regions. Check information in your region's oxygen folder in the Getting access to oxygen chapter.
A demand valve needs a pressure regulator, joined to it by an intermediate hose with a region-specific fitting. See Regulators.
Example: Life Support L063-05R.
Reservoir-bag setup: ClusterO2 kit or non-rebreather mask
A reservoir-bag setup uses a mask or mouthpiece fed by a reservoir bag, a balloon-like bag that fills with pure oxygen between breaths so a fresh stock is ready for your next inhale. Two devices share this design: the purpose-built ClusterO2 kit, and standard non-rebreather masks. Both work well for most people, are far cheaper than a demand valve, and are often easier to get prescribed. The ClusterO2 kit is built specifically for cluster headache patients.
A reservoir bag setup is paired with a flow regulator, and connects via standard oxygen tubing to a barb outlet on the regulator. See Regulators.
ClusterO2 kit. About $32 from clusterheadaches.com, formerly sold as the O2ptimask. It is a mask or mouthpiece designed specifically for cluster patients, with a proper seal and no side vents that could let room air in.
Standard non-rebreather mask. About $5–10 and widely available. Its side vents are a safety feature that prevents suffocation if oxygen runs out while the mask is strapped to the face, but they also let room air in and dilute the oxygen. We recommend removing the straps (and instead holding the mask firmly against your face) and obstructing the vents.
A simple face mask (no reservoir bag) or a nasal cannula is not an acceptable delivery device for cluster aborts, as it cannot deliver pure oxygen at a high enough rate.
If you have two cylinders (a large one for home and a smaller portable one), consider a regulator and breathing device for each. For example, a demand valve for home, and a cheaper ClusterO2 kit for the portable cylinder.
Cylinders
Medical oxygen is delivered as compressed gas in steel or aluminum cylinders. Sizes are labeled by letter (E, M, H/K) in North America and by letter-or-code in the UK and EU. Exact sizes are not fully standardized and vary by region and supplier, so treat the table below as representative examples rather than fixed specifications.
| Size (US) | Water capacity (EU/UK)¹ | Total O2 volume | Height | Weight (full) | Approx. aborting attempts² | Typical role |
|---|---|---|---|---|---|---|
| E | ~3.5 L | ~680 L / ~24 cf | ~75 cm / 30″ | ~8 kg / 18 lb | ~2 | Portable / car / backup |
| M | ~15 L | ~3,000 L / ~106 cf | ~120 cm / 47″ | ~14 kg / 30 lb | ~8 | Primary home cylinder |
| H / K | ~35 L | ~6,900 L / ~244 cf | ~140 cm / 55″ | ~60 kg / 135 lb | ~18 | Heavy-use / fewer refills |
¹ In Europe, cylinder capacity is commonly expressed as water capacity: the internal volume of the empty cylinder, in liters. The figures here are computed from the O2 volume assuming a 200 bar fill pressure (water capacity ≈ O2 volume ÷ 200), the EU norm. US medical cylinders typically fill to a lower pressure (~2,200 psi / ~150 bar), so their actual water capacity is larger than shown.
² Approximate number of 15-minute aborting attempts at 25 liters per minute (LPM), 375 liters each.
Recommendations:
- Keep additional, large backup cylinders at home if possible.
- Have a small portable cylinder for travels.
- Track your usage so you can schedule refills before you're on the last cylinder. In the US, a full medical cylinder reads around 2,000–2,200 PSI (about 138–152 bar); call for a refill when it drops below ~500 PSI (~34 bar). Some patients report that oxygen seems to lose effectiveness in the last third of the tank. Never let it drop below 50 PSI (3.4 bar) before returning the cylinder; some positive pressure is needed to keep moisture and contaminants out.
The aborting-attempts column shows why tank size matters: a single E cylinder might only get you through about two attacks before it needs a refill.
Some cylinders bundle the regulator into the cylinder head, so no separate regulator is needed. See Integrated-valve cylinders below.
Integrated-valve cylinders
Some cylinders have the regulator built into the cylinder head, with the flow dial, contents gauge, barbed outlet for tubing, and often a pressure outlet for a demand valve all in one piece. There is no separate regulator to screw on. Suppliers may call them integral-valve or integrated-valve cylinders.

In the UK and parts of continental Europe, these are common, especially for portable cylinders. In the US, you are less likely to encounter one.
If your cylinder has an integrated valve, check:
- For a reservoir-bag setup, that the flow dial reaches 25 liters per minute (LPM). Older units may cap at 15 LPM, which is the legacy clinical minimum but limits your breathing.
- For a demand valve setup, that there is a pressure outlet at 4 bar (50 psi) with the correct regional connector. See Outlet below for the connector standards.
Regulators, fittings, and tubing
A regulator fits to the cylinder valve, and controls how quickly oxygen is released from the cylinder. If your cylinder has an integrated valve, the regulator is already built in (see Integrated-valve cylinders); the outlet fittings below still apply to your cylinder's built-in outlets.
Which regulator you need depends on your breathing equipment:
- A flow regulator, also called an LPM regulator, has a dial calibrated in liters per minute (LPM). It pairs with a reservoir-bag setup: a ClusterO2 kit or non-rebreather mask.
- A pressure regulator delivers oxygen at a fixed output pressure rather than a set flow. A demand valve needs one. Demand valves generally require a pressure of 50 psi (3.4 bar) in the US and 4 bar (about 58 psi) in Europe.
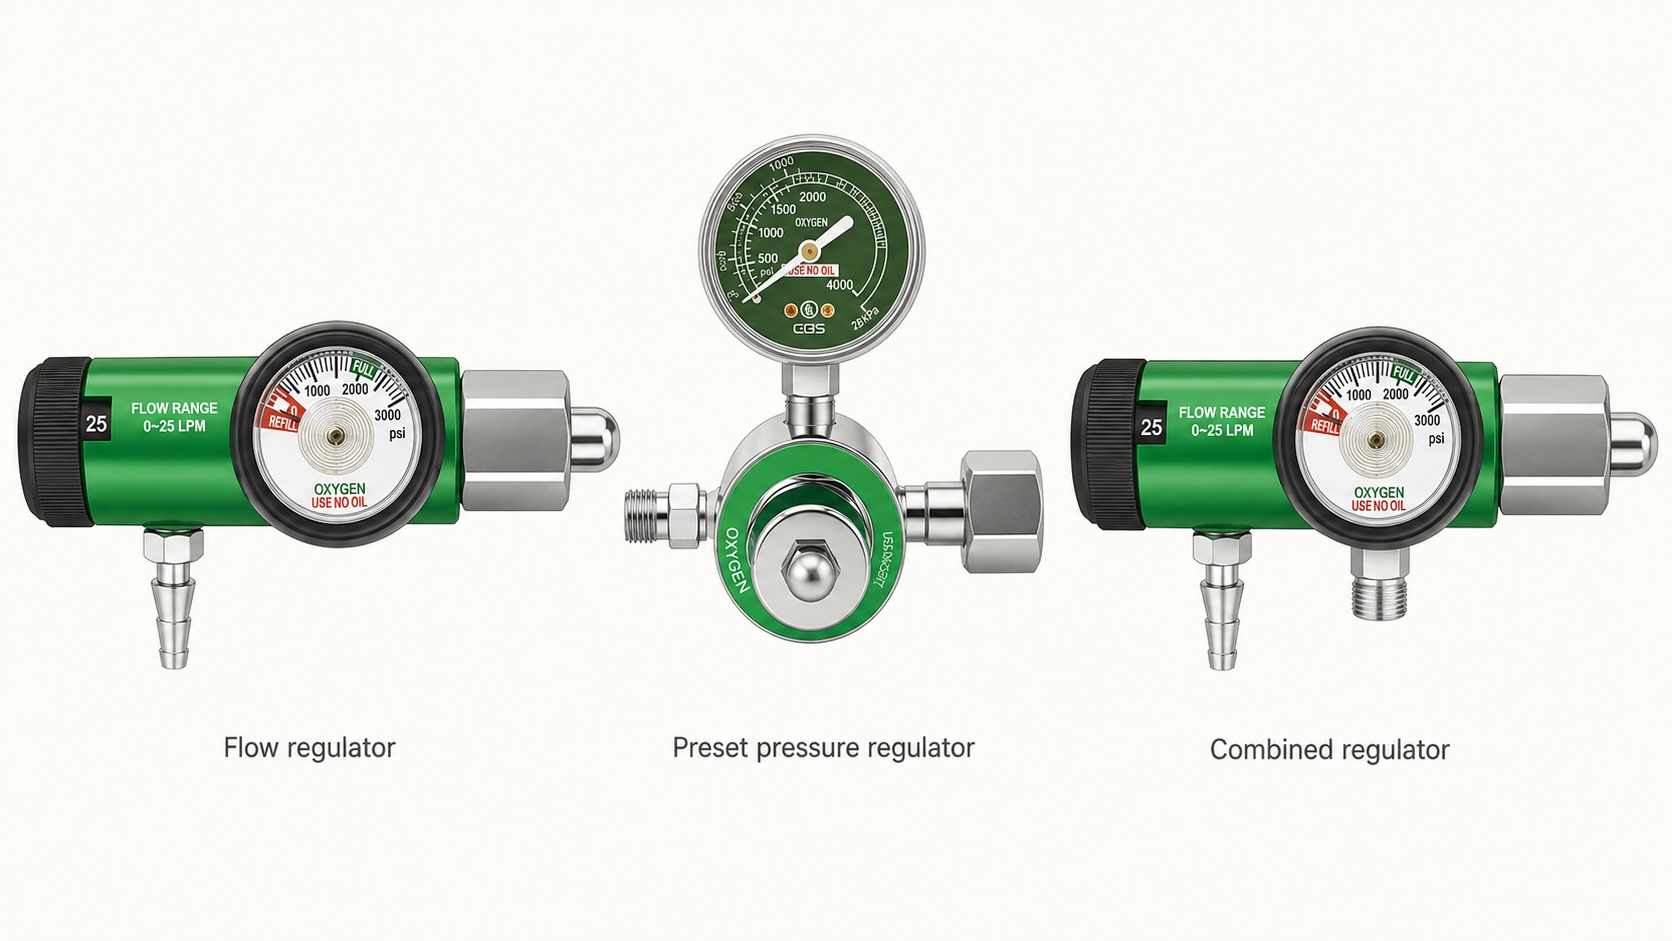 The regulator types. A flow regulator has a dial calibrated in liters per minute and a barbed outlet for standard tubing; it pairs with a reservoir-bag setup. A pressure regulator delivers a fixed output pressure and uses a region-specific demand-valve connector. Both thread onto the cylinder valve through a region-specific inlet fitting. Finally, a combined regulator combines both, and has two outlets: one at a preset pressure, and one at the flow chosen by the user.
Three things matter when it comes to the choice of regulator:
- Flow range (for a flow regulator).
- Outlet: the fitting that connects to your breathing equipment.
- Inlet: the fitting that connects to your cylinder.
Flow range
Flow range is a property of flow regulators, the kind used with a reservoir-bag setup. We recommend one that reaches at least 25 LPM; a 40 LPM or ultra-high-flow model is worth asking for if available. You then increase the flow until the reservoir bag refills fast enough to keep up with your breathing (see Assembly and testing).
If your supplier can't provide a high-flow regulator, you can buy one online. This is a one-time cost that can make the difference between oxygen working or not.
Outlet
The outlet is the fitting on the downstream side of the regulator, where your tubing or demand-valve hose connects.
- Barb outlet. A tapered, barbed fitting that standard oxygen tubing pushes onto, sometimes called a fir-tree outlet. This is the outlet on a flow regulator, used with a ClusterO2 kit or non-rebreather mask.
- Demand-valve connector. A pressure regulator's outlet takes an intermediate hose that carries pressurized oxygen to the demand valve. The connector is region-specific, and may be a threaded fitting the hose screws onto or a push-in quick-connect probe. In the US, demand valve hoses commonly connect to a 50 psi (3.4 bar) regulator outlet via a threaded oxygen DISS (Diameter Index Safety System) fitting; in the UK, to a 4 bar (58 psi) regulator outlet via a push-fit BS Schrader probe.
Inlet
The inlet is the fitting that threads onto the cylinder valve. It is typically not interchangeable across cylinder types. So if you have a portable and a static cylinder, you might need two regulators as well.
The inlet fitting varies across regions. The following table is indicative only; double-check with your supplier.
| Region / cylinder type | Inlet fitting |
|---|---|
| US welding cylinders (all sizes) | CGA 540 (threaded post) |
| US medical, small portable (D, E) | CGA 870 (pin-index yoke) |
| US medical, larger home sizes (M60, M, H, K) | CGA 540 (same as welding) |
| UK medical | Bullnose (BS 341 No. 3) on older cylinders; pin-index on newer ones |
| Germany, Austria, Switzerland, Poland, Romania, Bulgaria, Slovenia | DIN 477-9 (threaded, G3/4") |
| France, Spain, Portugal, Belgium | AFNOR NF E 29-656 (threaded bullnose) |
| Italy | UNI 4406 (threaded) |
| Smaller medical cylinders across the EU | Pin-index (EN ISO 407) is also common; ask your supplier |
Assembly and testing
Installing the regulator
If your cylinder has an integrated valve, there is no separate regulator to install. Skip ahead to Installing the breathing equipment.
Generally, regulators attach to the cylinder valve in one of two ways:
- Small portable cylinders use a pin-hole connection, where two pins on the regulator align with matching holes on the cylinder valve and are clamped tight with a T-handle;
- Large static cylinders for home use have a threaded connection, where a large nut on the regulator screws onto the valve outlet and is snugged with a wrench.
The regulator attaches to the cylinder valve through a fitting specific to the region and cylinder size. The videos below cover the two common US fittings. For non-US fittings, the connector geometry differs but the procedure remains similar.
Pin-index regulator (CGA 870).
Installing a CGA 870 regulator (for US small portable cylinders, such as size E).
Install your pin-index regulator by aligning the two pins with the holes on the cylinder valve and tightening the T-handle. Make sure the regulator has a fresh washer to create a good seal and that the flow dial is set to zero before you open the cylinder.
Threaded regulator (CGA 540).
Installing a CGA 540 regulator (US welding cylinders and larger US medical M/H/K cylinders).
Connect your threaded regulator by hand-tightening the large nut onto the cylinder valve, then snug the final turn with a wrench. After confirming the flow dial is at zero, open the cylinder by turning the hand wheel on top of the valve.
Use no tape, sealant, or grease on any oxygen fitting. Oil near high-pressure oxygen is a fire hazard.
Installing the breathing equipment
The exact steps depend on the device, but the principle is the same: connect, no lubricant, leak-check.
For a demand valve, follow the manufacturer's instructions for joining the intermediate hose between the pressure regulator outlet and the valve inlet. The fitting is region-specific (DISS in the US, BS Schrader in the UK).
For a reservoir-bag setup, push standard oxygen tubing onto the barbed outlet of the flow regulator, and connect the other end to the mask or mouthpiece.
The video below walks through assembling a ClusterO2 kit.
Assembling a ClusterO2 kit. The video shows the legacy OptiMask; the current kit uses the same design.
Once everything is connected, put the mask or mouthpiece on and breathe. See Breathing techniques in the Usage chapter for what to do next.
Setup overview
For a single walkthrough that covers the whole picture (cylinder, regulator, tubing, and both demand-valve and reservoir-bag breathing equipment), see this demonstration of the different oxygen setups on YouTube.
Safety at home
Oxygen doesn't burn on its own, but it makes everything else burn faster and hotter. This means:
- No smoking near the cylinder or while wearing the mask.
- No open flames or sparks nearby.
- No oil or grease on the valve, regulator, or fittings.
- Store the cylinder upright, secured. A falling cylinder can shear off its valve, causing a dangerous leak or turning it into a projectile.
- Close the valve after every use.
- Never return a completely empty cylinder. Leave at least 50 PSI (3.4 bar) of positive pressure (your regulator gauge will show this). Without positive pressure, moisture and contaminants can enter the cylinder through the valve.
- Keep the valve cap on during transport. It protects the valve from impact damage.
- Ventilate. A normal room is fine; just don't use it in a tiny sealed closet.
Did you find this page helpful?
Disclaimer
The information on this website is provided for educational and harm reduction purposes only. It does not constitute medical advice and should not replace consultation with a qualified healthcare professional. See our Legal page for more details.